
| Back to YellowHead Studios - Films |
|
Behind the Scenes of Daedalus and IcarusOn these pages I hope to tell you a thing or two about the production process at YellowHead Studios. Please do not read this before you've seen the film, because it is filled with spoilers! Technically I believe this film was our biggest challenge - and our biggest success - yet. New equipment, such as the Panasonic NV-DS29 MiniDV camera (first used for Great Inventors 2), a tripod (first used for this film) and capture software supporting frame averaging (MonkeyJam 3.0b) helped me realising scenes with zoom, focus pulls and camera viewpoints that were very hard to achieve when I only had Lego to support the cam. But naturally it didn't start with that. Here's what I did first.
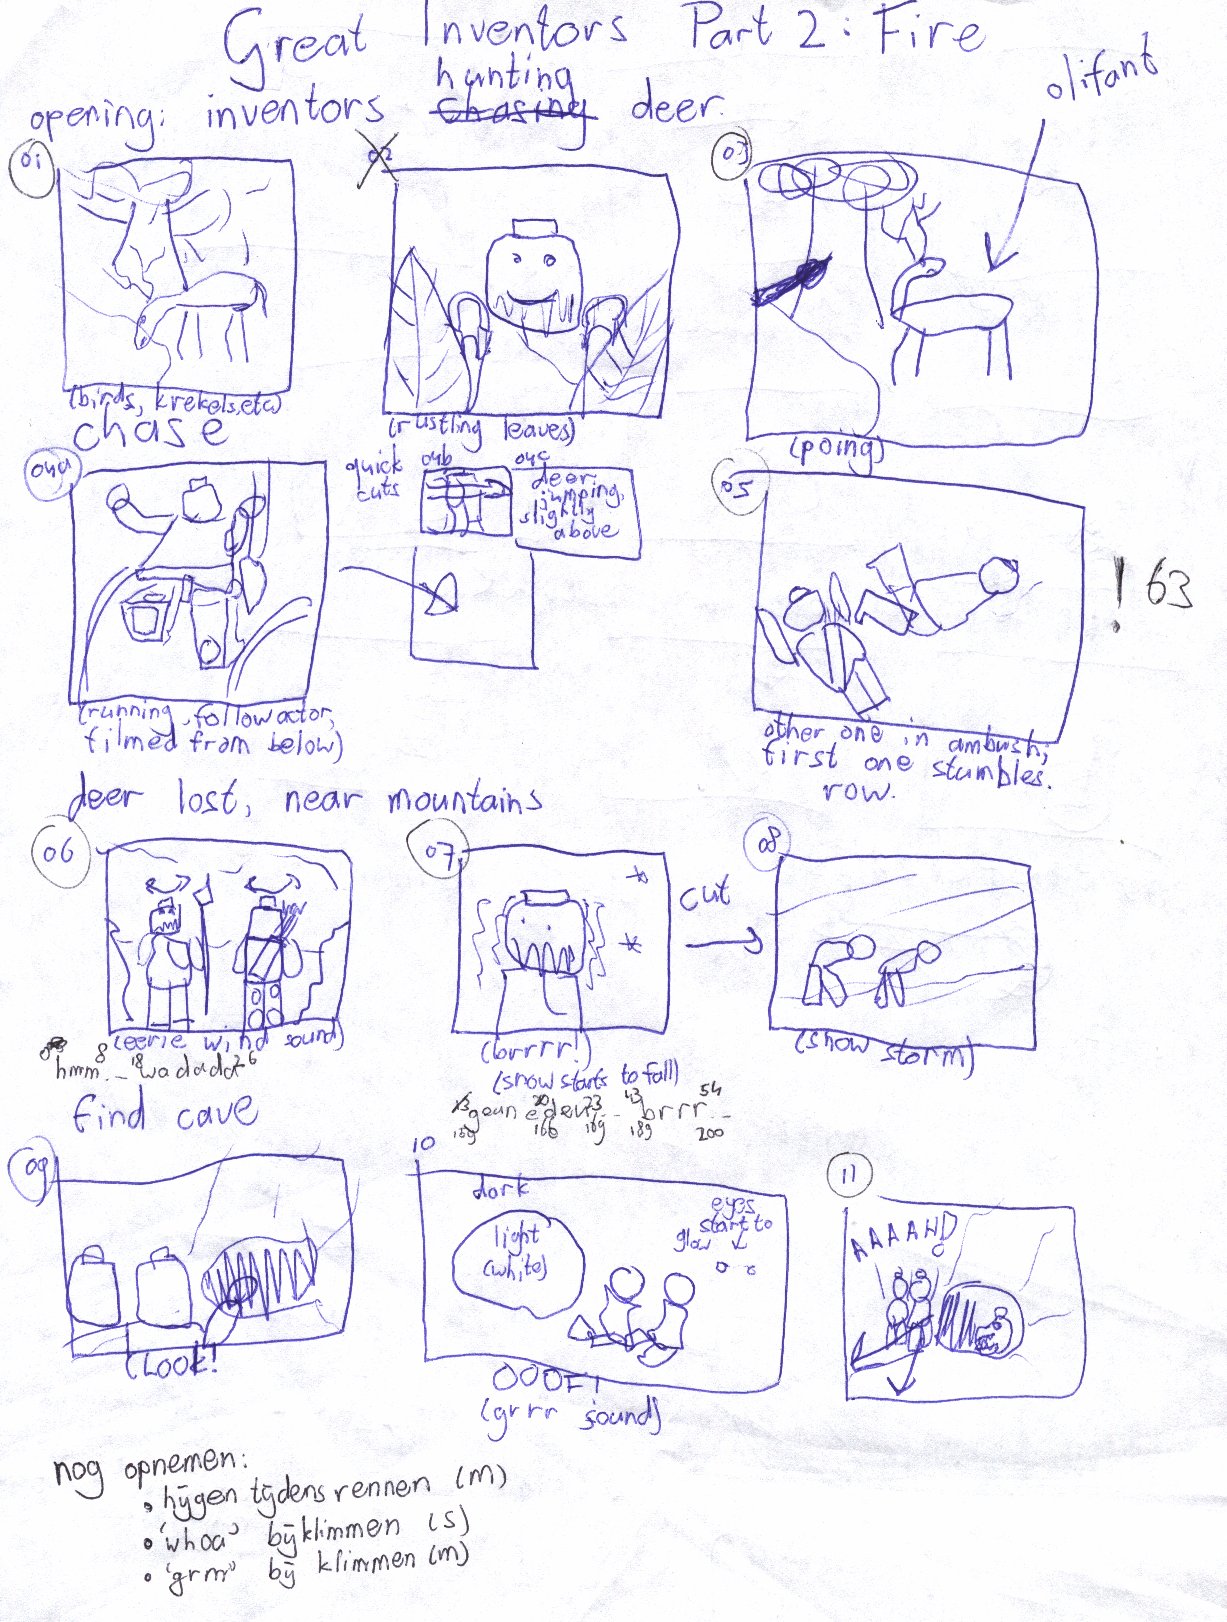
On hindsight, this was not the smartest thing to do. Of course, I had some images in my head, but for many of the scenes I had to make up something that fit the text only then. This is why the text sometimes stops for a long time, only to deliver one short sentence after that. Next time I will try a more graphical approach while creating the storyline. I will probably end up with something in between this take and what I did for Great Inventors 2 (storyboards only; see them here and here - images are fairly large!).
The first scene filmed was the one where Icarus hears of the arrival of the ship and runs to meet his father. This scene made me realise what the production process would be like: build a set, shoot about 10 seconds on it, and tear it down for the next set. For quite a few of these sets I spent nearly a day building them (often with the camera turned on to see what would be in view, and how things would look). After that there were about 3 hours of animating, and then I'd go to bed. My bed, at that time, would look like this:
Naturally, the sound of Lego bricks being shoved into boxes is not something that pleases your parents, who sleep in the next room, particularly at 1am. As I couldn't bring myself to sorting all pieces after tearing down, the mess in my room grew larger and larger as I progressed. The first scene also learned me something that would haunt me throughout production: whenever I used the tripod, I was confronted with the fact that my table is not very stable. Stretching my leg in the wrong direction would immediately result in a jump in the result. Careful repositioning can lessen the effect, but several bumps are still noticeable in the result. A few scenes later my first big challenge arrived: the opening shot with the ship filmed from above. It doesn't look half as good as I would have liked - I think the choice for the water material (reflective foil) was not a wise one in this case. The solution I used for the scene where Icarus spirals towards the sun - a blue sheet of paper with plastic wrap over it - would have looked much better. But the deadline drew nearer, so there was no time for reshoots. The record player was stored away in a distant corner of the attic, so I built my own turntable. I can assure you that the position I had to animate from was by far the most uncomfortable I've ever been in during my filmmaking career.
A note about the skies: for these I took a series of slides with my old analog 35mm photo camera. A slide projector would project them behind my set. There are a few advantages to this approach, such as
However, some disadvantages surfaced during production
To conclude, I will pay some more to have real backdrops printed next time, and only resort to slides when all else fails. A static matte may also be an option if the scene is framed carefully.
Another scene which required me to build more than just the set was the walk through the maze, ending with the encounter with the Minotaur. The maze was very modular: I had separate walls and floors that could be combined into hallways. The floors were made to fit into tracks, on which they could slide towards the camera and rotate. This created the illusion of walking through the maze. The minotaur was a custom head made out of clay. At first he looked cute rather than menacing, so I took my set of CD pens (4 colours) and made the eyes and line on his head darker. It looked much better right away! The horns are normal Lego. I forgot to add a nose ring, but it's good enough this way for the few seconds that it appears on screen.
The set showing the entrance to the labyrinth is one I'm particularly proud of. I bought a piece of what train hobbyists use for grass, which looks great, but leaves a track of tiny, hairy bits when you cut it. Originally I wanted the door to slide open upwards, but while building the set I realised that it was either that or the base of the giant temple in clear view - both wouldn't fit on screen. And I liked these huge columns, so I went for the option you see in the film.
Now we can finally make Daedalus and Icarus fly. The wings were actually the wings of 2 christmas tree decoration birds. They are still lying on my desk wingless (and tail-less). The wings were actually one piece (3 synthetic feathers glued together), and the ideal size for this film. I used a piece of wire to be able to animate them. The wire was obtained by removing the plastic from twist ties. It was thin enough to allow easy animation. The wire you get from paperclips is too tough. The ties, wings and minifig are held together by Pritt Poster Buddies, the Dutch equivalent of Blue Tack, which is coloured white. This colour made it easier to pretend it was actually wax.
I will conclude with several "before and after" shots that will hopefully give an idea of the masking process. I used BSOL to remove all supports from the pictures manually.
I hope I have inspired you with this "behind the scenes" feature to create your own brickfilms. Happy filming! |
|
YellowHead Studios have no affiliation with The Lego Company, and do not make any profit out of this project. Films are for personal use only and should not be redistributed or changed without permission. |


